| Month | Day | Session | Deep.Dive |
|---|---|---|---|
| Feb. | 11 | Discussing the schedule & environmental setup | |
| Feb. | 18 | Data preparation, Model API, Discuss tuning and experiment tracking | |
| Feb. | 25 | Intro. models for language and regression tasks | |
| Mar. | 4 | No Session (Maize Meeting) | |
| Mar. | 11 | Discussion: Learning Projects Planning | |
| Mar. | 18 | ||
| Mar. | 25 | Implementing a transformer (1/2) | But what is a GTP 0h27, Visualizing Attention 0h26 , Generatively Pretrained Transformer 1h56 , How might LLMs store facts 0h22 |
| Mar. | 30 | ||
| Apr. | 8 | Implementing a transformer (2/2) | |
| Apr. | 15 | ||
| Apr. | 22 | Presentation: Learning Project Results | |
| Apr. | 29 |
Spring Session: Preparation and Schedule
Schedule
Deep Learning
Welcome!
Hello and welcome to our deep learning spring session! We are iterating on the material we discussed over the during the fall with an eye towards application, logistical details, and when you might select a neural network rather than another model. If someone has directed you to this page and you’d like to be added to the mailing list, please get in touch with us.
What We Have Planned
Below is our “working draft” for the spring. Based on the feedback survey we’re focusing more on application and less on theory. This means that it will be important to have a good grasp on python’s fundamentals, so you may wish to review the recording of Daniel’s introduction lecture from the fall. Here is a tentative schedule
Logistical Notes
To focus on application and allow for easier re-use of materials there is now a repository on github for our group: dlcp2025. This repository will hold classes, small datasets, environment files and the like and will be updated as we go.
To ensure that the code we write together runs on everyone’s computer we’re recommending the following set of tools. You’re welcome to use a different set, but we may not be able to help if you run into issues.
- Visual Studio Code - A common IDE that works well with the Windows subsytem for linux and remote machines)
- Microsoft’s Live Share plugin - Provides a way to collaboratively edit a code (think “google docs for code” or Teletype).
- A linux / *nix shell - If on windows, use the WSL. If on OSX use the built in terminal.
- uv - A fast python package manager. This will take care of enviroment creation and management.
If you have a conda/mamba enviroment that you already are using for deep learning, you’re welcome to use that as well. However you will likely need to make additions to it as we add tools beyond torch for experiment tracking and hyperparameter tuning.
Setup:
Assuming you have the recommended tools, start by cloning the shared repository to your local machine. You can do this from the *nix shell or through GitHub desktop.
Once downloaded you should see at minimum .toml file and a .lock file. These are the files that uv will use to build the virtual enviroment for us.
$cd ./path/to/GitHub/directory
$git clone https://github.com/DanielKick-USDA/dlcp2025.git
$cd dlcp2025/
$ ls
pyproject.toml  uv.lock
If you saved the repository outside the WSL filesystem (e.g. in Documents) you’ll need to make a note of where it is. Windows directories are accessible like so: /mnt/c/Users/YOUR.USER.NAME/GitHub/dlcp2025/. You might consider creating a symbolic link in your linux home that points to this folder (see Tip: Make your life easier with Symbolic Links in WSL)
Now run uv sync. This will set up the environment. It may take a few minutes (4m 37s on my machine). You’ll see something like this:
$ uv sync
Using CPython 3.11.11
Creating virtual environment at: .venv
Resolved 151 packages in 15ms
░░░░░░░░░░░░░░░░░░░░ [0/146] Installing wheels...                                                                       warning: Failed to hardlink files; falling back to full copy. This may lead to degraded performance.
         If the cache and target directories are on different filesystems, hardlinking may not be supported.
         If this is intentional, set `export UV_LINK_MODE=copy` or use `--link-mode=copy` to suppress this warning.
██████████████████░░ [136/146] scikit-learn==1.6.1
We can list hidden files to confirm we now have a .venv (with our virtual environment)
$ ls -a
.  ..  .git  .venv  pyproject.toml  uv.lock
Because we’re installing a good number of deep learning and machine learning tooling, this .venv directory will be sizable.
$ du -h -d 1
116K    ./.git
5.3G    ./.venv
5.3G    .
Using a .venv with vscode
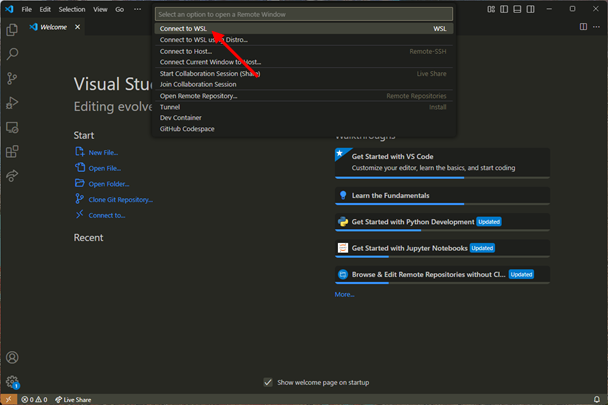
To use our uv virtual env we need to first connect to the WSL. Windows treats this like we’re connecting to a remote machine. Click on the connection tile…
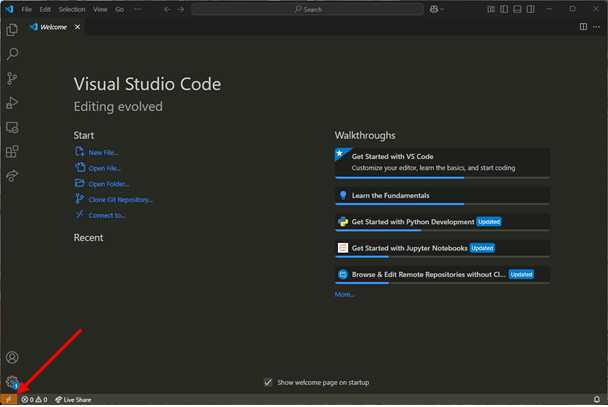
Then select “Connect to WSL”.
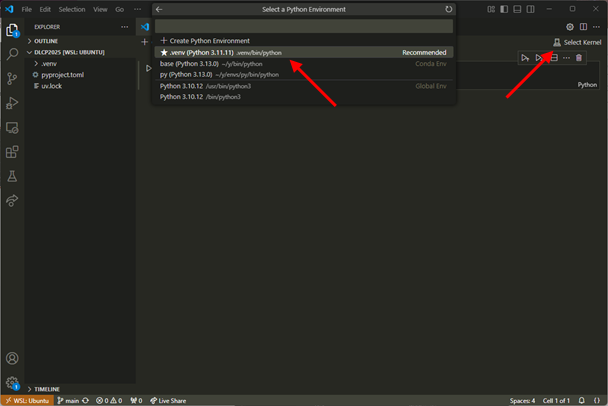
Select File -> Open Folder and navigate to your repository (this should be easy if you created a symbolic link as mentioned above. After selecting the the dlcp2025 folder you should see at least the .venv folder and uv’s lock and toml files.

Here we’re looking at a new notebook. On the left you’ll note a “Select Kernel” button. When you click it the drop down in the middle will open. VSCode will likely recognize and suggest the virtual environment and suggest it. Select “.venv”. You should now be set.
One quirk to be aware of is that on WSL the first cell you run in a notebook may take many seconds to complete. This is normal and should not be the case for subsequent cells.
Meeting Notes
- The slides from today can be found here.