Website Overview
Initial Setup:
Update: 9/18/2024 If you haven’t setup git please review this presentation and setup git and GitHub.
Desktop Version
The easiest way to get the desktop version working is to create a new website or blog and render it. Any missing packages will cause an error. After it builds successfully, you can discard the newly made project directory and switch to this one.
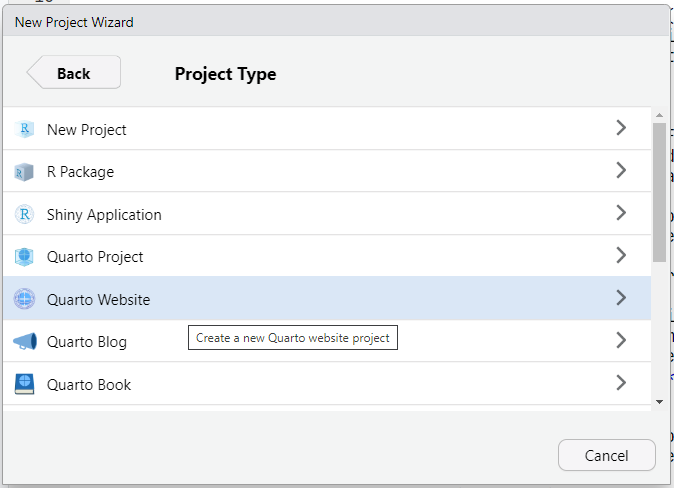
In RStudio, select File > New Project > New Directory and select either Quarto Website or Quarto Blog.

Follow the remaining prompts placing the project directory in a location where it will be easy to remove.
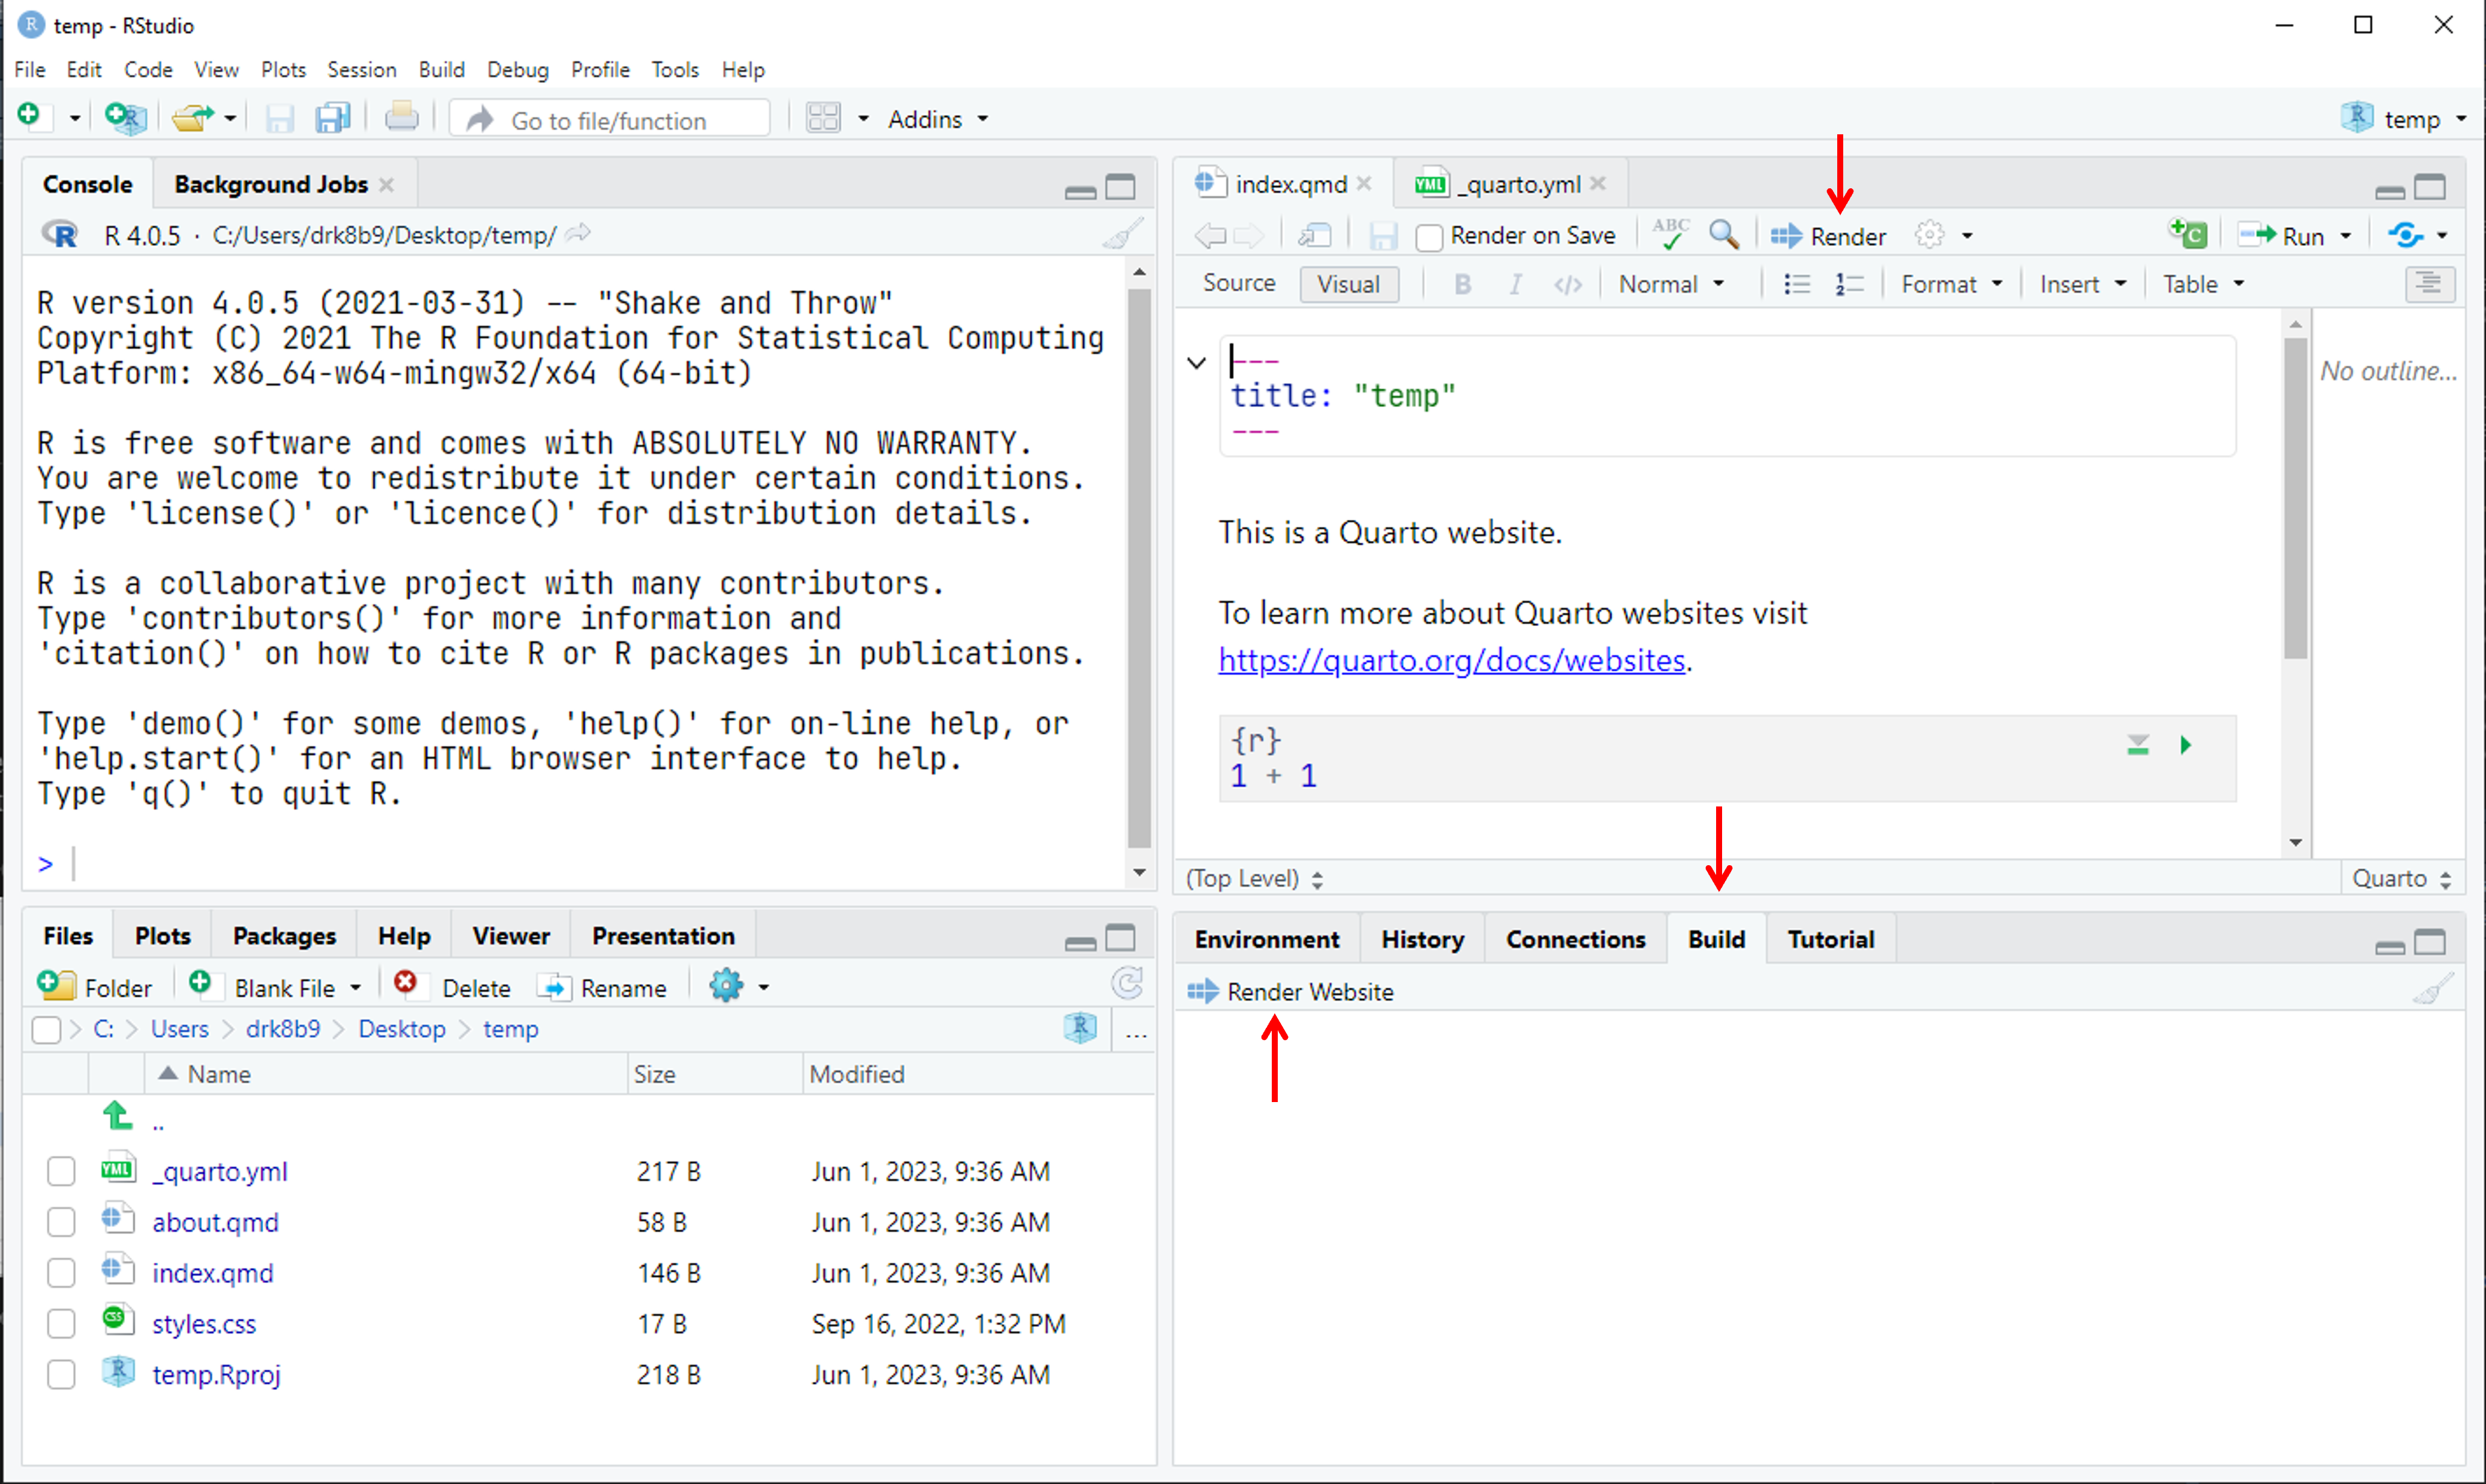
The template site will look like this. Since the focus here is checking dependencies we won’t go into what each of these documents are but Quarto’s documentation is quite good if you would like to learn more.

Note that there are two render buttons. The one on the top pane renders a single document. This is useful to check how a document looks without rebuilding the entire website or for updating a document that is “frozen” and will not be re-rendered when the website is built. The second one under the build tab and will setup the website when run. Render
index.qmdnow and address any errors (missing libraries) that come up.Now render the website. Your default web browser should open to
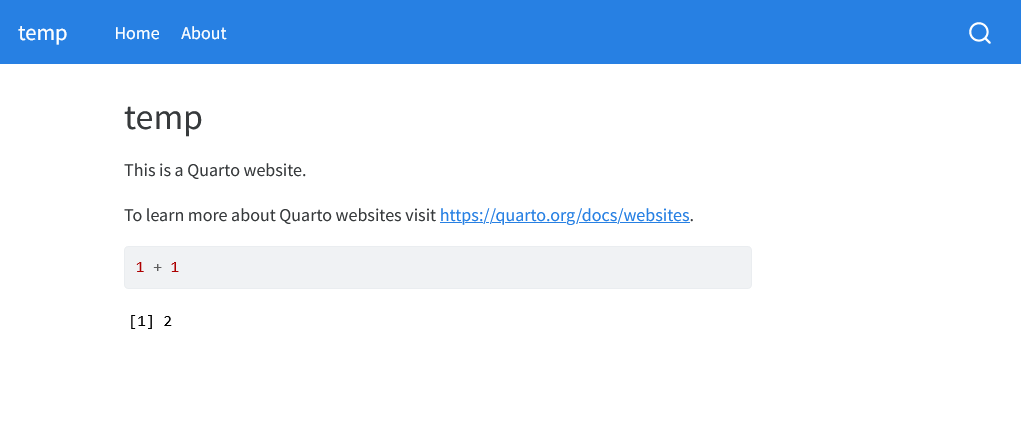
localhost:####. The page will look like this:
Now you are ready to build the documentation site! You can close the RStudio project, delete it, and switch to the website repository.
Containerized Version:
This is a terse variant of these instructions.
mkdir rstudio_container && cd rstudio_container

# Add necessary subfolders -----------------------------------------------------
mkdir -p run var-lib-rstudio-server
printf 'provider=sqlite\ndirectory=/var/lib/rstudio-server\n' > database.conf
mkdir home

# Add in preferences -----------------------------------------------------------
mkdir ide_settings
# if you're running from within the WSL
# cp /mnt/c/Users/<USER NAME>/AppData/Roaming/RStudio/rstudio-prefs.json ./ide_settings/
# if you're running from OSX/Linux
# cp ~/.config/rstudio/rstudio-prefs.json ./ide_settings/

# Create container with publishing capabilities --------------------------------
echo "Bootstrap: docker\nFrom: rocker/verse:4.2" > RStudio.def
sudo singularity build RStudio.sif RStudio.def

# Initial run without preferences ----------------------------------------------
singularity exec \
  --bind run:/run \
  --bind var-lib-rstudio-server:/var/lib/rstudio-server \
  --bind database.conf:/etc/rstudio/database.conf \
  --bind home:/home \
  --bind /mnt/c/Users/drk8b9/Documents/LabProtocols:/home/rstudio/LabProtocols \
  --bind ide_settings:/home/rstudio/.config/rstudio/ \
  RStudio.sif \
  rserver \
  --www-address=127.0.0.1 \
  --www-port=8700 \
  --server-user=rstudio

# Then shutdown server.
Opening the Project
Before starting, please ensure you’re working with the most up to date version of the site. Use your git client to pull from the main repository. If you’re using a desktop copy of RStudio you can open the project as you normally would. If you’re using the containerized version you need to cd into rstudio_container and then run the following command. Note that you’ll need to change the /mnt/c/Users/drk8b9/Documents/LabProtocols to the location you have the repository saved. After running this command, open a browser to localhost:8700. If you are asked, the default login is “rstudio” and “rstudio”.
singularity exec \
   --bind run:/run\
   --bind var-lib-rstudio-server:/var/lib/rstudio-server\
   --bind database.conf:/etc/rstudio/database.conf\
   --bind home:/home\
   --bind /mnt/c/Users/drk8b9/Documents/LabProtocols:/home/rstudio/LabProtocols\
   --bind ide_settings:/home/rstudio/.config/rstudio/\
   RStudio.sif\
   rserver\
   --www-address=127.0.0.1\
   --www-port=8700\
   --server-user=rstudio
Website Structure
Project Root
Let’s look at this project from a high level. In this directory there’s an Rproj (that you’ve opened), documents for the landing page (index.qmd) and about (about.qmd) pages, directories for protocols and info on people, documents that control the website style and layour (_quarto.yml, styles.css), and a folder that contains the generated html pages (_site).
LabProtocols
├── LabProtocols.Rproj
├── _quarto.yml
├── _site
├── about.qmd
├── index.qmd
├── people
├── protocols
└── styles.css
The index.qmd file contains links to protocols. Whenever new pages are added they should be linked here to be visible. The about.qmd file has information on the lab and it’s members. Lab member pictures are pulled from /people/ so any new pictures should be added there along with any personal pages (e.g. if we want to link student resumes). Additional folders could be added to hold assests that may be useful. For instance, we could add a /papers/ folder and link from index.qmd to the lab’s papers. This would be helpful for on boarding.
Protocols
The protocols folder is where most of the work happens. Inside it there are subfolders to roughly group protocols. Right now it contains Drones, Logistics, and Operations. Other useful groups might include Rootbot, Wet Lab, and Field Work. Each protocol page is a folder within one of these groups. For consistency it should be named in Capitalized_Snakecase and contain a Quarto document called index.qmd. There may be images in this folder as well. See the documentation on preparing protocols.
protocols
├── Drones
│   └── Pix4Dmapper_Stitch
│       ├── Picture1.png
│       ├── ...
│       ├── Picture8.png
│       └── index.qmd
├── Logistics
└── Operations
Making new protocols
The easiest way to make a new protocol is to copy the folder for an existing protocol and modify that. Give the folder an informative, Capitalized_Snakecase name and delete any photos or other artifacts that you don’t need. Then open up the index.qmd file and begin editing it.
At the top of the file you’ll see some YAML which provides metadata for the page.
---
title: "Building an RStudio Singularity Containers"
author: "Daniel Kick"
date: "5/31/2023"
date-modified: "5/31/2023"
execute:
  freeze: true
---
Note the last two lines here. At present this document is frozen so it will not be re-rendered when the website is built. This means that to update this page you’ll need to click the “Render” button on it before rendering the website. Any pages with code that rely on non-standard libraries should be frozen (so that other people don’t need those installed to rebuild the site) but it is okay to remove these lines while working on a protocol.
Making protocols visible
Once a protocol is added it needs to be linked on the index.qmd in the project root so it is accessible. Open that document and add a link to the html version of the file. For example, this page is linked on that page as [Website Overview](/protocols/Operations/Website_Overview/index.html). Once this is done, rebuild the website by clicking ther “Render Website” button under the “Build” tab.
Deploying updates
<font color =“red”> *This section is intentionally left blank. Likely we will deploy through GitHub pages* </font>